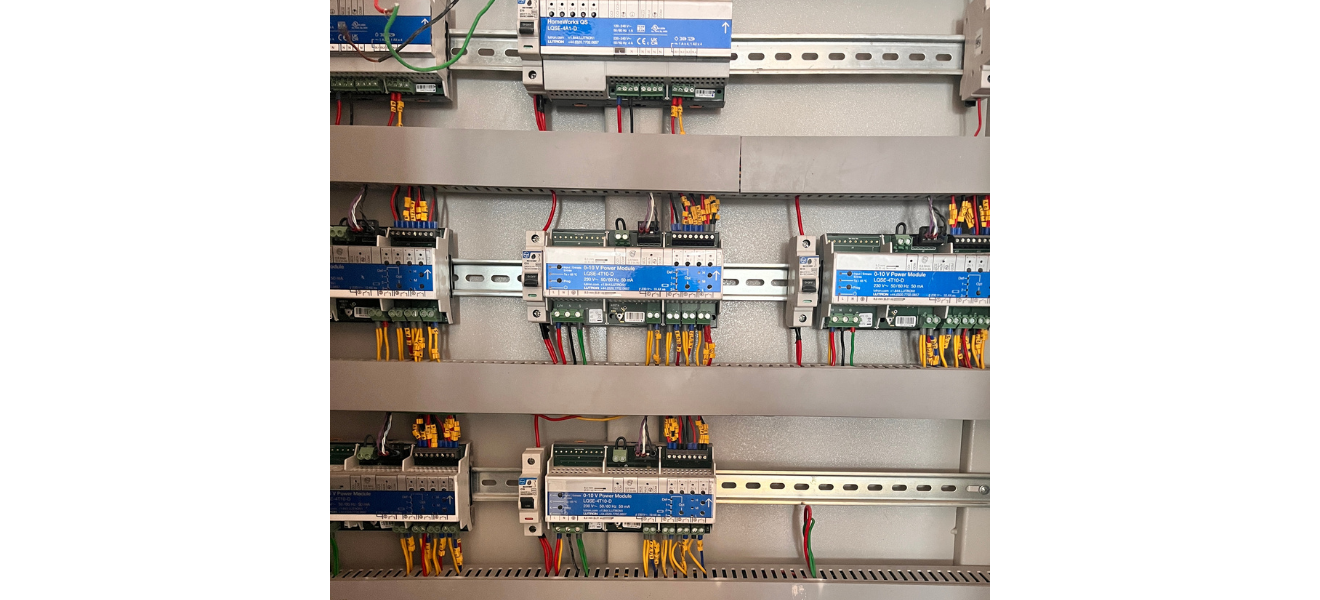
1. Modules for controlling lighting (0–10V Power Modules)
The blue and white boxes with the words "0–10V Power Module" on them are lighting-dimming modules.
Why they are put in:
- To turn lights on and off
- To smoothly dim lights with a 0–10V control
- To run several lighting circuits from one system
- Used a lot for LED panels, downlights, linear lights and lights on the outside of buildings
Each module controls a number of different lighting areas.
2. The main lighting controller (top module)
What it is:
The top unit is the main processor and controller for the lights.
Why it was put in:
- Sends control signals to all of the dimming modules.
- Allows control of the scene (day, evening, presentation or cleaning mode)
- Allows for automation, scheduling, and working with switches, touch panels or BMS
This is the part of the lighting system that controls everything.
3. DIN Rails
What they are:
The metal rails that run horizontally and hold all the devices.
Why they are put in:
- Normal way to put electrical devices on a wall
- Keeps parts in line, safe and ready to use
- Makes it easy to add or replace things in the future
4. MCBs and other safety devices
What they are:
Small white breaker like units that sit next to modules.
Why they are put in:
- Prevent each circuit from getting too much power or shorting out.
- Make it safe to separate during maintenance
- Needed for electrical safety standards
5. Terminal Blocks and Wiring Harnesses
What they are:
Green and black connector strips with yellow wire ferrules that are neatly crimped.
Why they are put there:
- To cut wires in a way that is safe and clean
- Make sure connections don't come loose.
- Make it easier to fix problems and more reliable
Ferrules are a sign that a professional did the panel work.
6. Cable ducts with openings
What they are:
Gray horizontal channels that cover and direct wires.
Why they are there:
- Put the cables in the right order
- Protect wires from damage
- Make it easier for air to move and heat to get out.
- Make the panel look clean and professional.
7. Wiring for power and control
What they are:
- The power supply gets red and black wires.
- Control and dimming signals are sent in yellow, green and other colors.
Why they are put in:
- It is safer to keep the wiring for power and control separate.
- Allows for accurate dimming and zoning
The main reason for installing this whole panel is
This panel is put in place to:
- Efficiently control a lot of lights
- Allow dimming to save energy
- Make scenes with light
- Cut down on manual switching
- Make the lighting more comfortable and attractive
- Instead of having separate switches, let one person control everything
Where You Usually See Panels Like This
- Offices for businesses
- High-end stores
- Hotels and banquet halls
- Malls and airports
- High-end villas & apartments
What each number is + its activity (step-by-step)
1 — Main Lighting Controller (Brain)
Activity (how it works):
- Receives commands from switches/touch panel/BMS/app (depending on site setup)
- Decides which lighting “zones” should turn ON/OFF or DIM
- Sends control instructions to the modules (Nos.2/3/4/5)
2 / 3 / 4 / 5 — 0–10V Power Modules (Dimmers / Zone Controllers)
These are the main working modules controlling different lighting circuits.
Activity (how it works):
- Gets power input from protection breakers (MCBs)
- Gets control signal (0–10V dimming or command) from controller (No.1)
- Switches ON/OFF each zone and sends dimming output (0–10V)
- Feeds power to the connected light circuits (downlights, panels, linear lights, etc.)
(Each module usually handles multiple channels/zones.)
6 — MCB (Protection for a section / module)
Activity:
- Allows power to pass to module (No. 3 area)
- If overload/short happens, it trips and cuts the supply
- Helps maintenance: you can isolate that section safely
7 — MCB (Protection for another section / module)
Same job as No.6, but for the right-side module section (No.4 area).
8 — Terminal / Connector Area (control & wiring termination)
Activity:
- All field wires come here (control wires + some outputs)
- Provides firm, safe connection points
- Makes troubleshooting easy (identify, test and replace without disturbing everything)
9 — Cable Duct / Wiring Channel
Activity:
- Routes wires neatly
- Protects wires from damage
- Keeps power/control wiring organized and reduces confusion during servicing
10 — DIN Rail (Mounting rail)
Activity:
- Holds all modules and breakers in a standard mounting format
- Makes additions/replacements easy
- Keeps the panel mechanically strong and aligned
How This Lighting Panel Works in a 10,000 Sq Ft House
Typical Areas Covered
In a house of this size, lighting is usually divided into zones like the following:
- Living room
- Dining
- Bedrooms (multiple)
- Corridors
- Staircase
- Landscape / facade
- Accent & cove lighting
- Each zone is controlled from this panel.
STEP-BY-STEP OPERATION FLOW (Number-wise)
STEP 1 – Command Starts (No. 1: Main Controller)
Example:
You press “Evening Mode” on a wall keypad or touch panel.
What happens:
- No. 1 (Main Controller) receives the command.
- It already has preprogrammed scenes (morning / evening / night / party)
This is the decision-making unit.
STEP 2 – Controller Sends Instructions (No. 1 → No. 2/3/4/5)
Example Evening Mode Logic:
- Living room cove → 60% brightness
- Chandeliers → 100%
- Corridor lights → 40%
- Bedroom lights → OFF
The controller sends signals to:
- No.2 → Living & Dining zones
- No.3 → Bedrooms
- No.4 → Corridors & staircase
- No. 5 → Outdoor / feature lighting
STEP 3 – Power Safety Check (No. 6 & No.7: MCBs)
Before power flows:
No.6 & No.7 (MCBs) ensure:
- No short circuit
- No overload
- Safe current level
If anything is wrong → MCB trips, rest of house stays safe.
STEP 4—Dimming & Switching (No. 2 / 3 / 4 / 5: Power Modules)
Each power module:
- Takes 230V power
- Applies 0–10V dimming signal
- Sends controlled power to lights
Example:
- Cove LED → dimmed smoothly
- Downlights → soft ON
- Feature lights → full brightness
This is where actual lighting change happens.
STEP 5 – Clean Signal Distribution (No.8: Terminal Blocks)
- Control wires
- Dimming wires
- Output wires
All are:
- Neatly terminated
- Clearly separated
- Easy to trace for maintenance
This is critical in a big house where hundreds of wires exist.
STEP 6 – Wire Management & Cooling (No.9: Cable Ducts)
In a 10,000 sq ft house:
- Many circuits run continuously.
Cable ducts:
- Prevent overheating
- Avoid wire damage
- Keep the panel future-ready
STEP 7 – Physical Stability (No.10: DIN Rails)
- Holds everything firmly
- Allows new zones later (guest room, basement, theater, etc.)
Why Is Such a System Used in a Big House (10,000 sq ft)?
- ✔ No messy switchboards
- ✔ Single-touch lighting scenes
- ✔ Energy saving through dimming
- ✔ Long LED life
- ✔ Silent operation
- ✔ Premium feel
- ✔ Easy future expansion
Inside a Smart Lighting Panel: How a 10,000 Sq Ft Luxury Home Controls Its Lights
In large luxury homes, lighting is not controlled by simple wall switches alone. When the house size goes beyond a few thousand square feet, lighting needs to be organized, safe, flexible and intelligent.
The image above shows a central lighting automation panel installed in a 10,000 sq ft residence. This single panel controls lighting across multiple rooms, floors and zones with smooth dimming and scene control.
Let us understand what each numbered component does and how the system works step by step.
Why a Central Lighting Panel Is Needed in Big Homes
In a large house:
- Hundreds of lights are installed
- Multiple lighting moods are required.
- Energy saving becomes important
- Maintenance must be easy and safe.
A central panel like this replaces the following:
- Bulky switchboards
- Manual dimmers
- Random wiring
It brings clean design, automation, and comfort.
Explanation of Each Number Marked in the Image
1. Main Lighting Controller (System Brain)
This is the most important device in the panel.
What it does:
- Stores lighting scenes like morning, evening, night, and party
- Receives commands from wall keypads or touch panels
- Sends instructions to all lighting modules
Example:
When “Evening Mode” is selected, it decides which lights should turn on, off, or dim.
2, 3, 4 & 5. 0–10V Power Modules (Lighting Control Units)
These modules actually control the lights.
What they do:
- Receive power supply
- Receive dimming instructions from the main controller
- Switch lights ON or OFF
- Dim LED lights smoothly from 0–100%
Each module controls multiple lighting zones,such as the following:
- Living room
- Bedrooms
- Corridors
- Accent and facade lighting
6 & 7. MCBs (Safety Protection)
These are protective breakers installed for safety.
What they do:
- Protect lights and modules from overload
- Cut power during short circuits
- Allow safe maintenance by isolating sections
This ensures the entire house does not go dark if one circuit fails.
8. Terminal Blocks (Wire Connection Points)
This is where all field wiring comes together.
What they do:
- Hold control wires securely
- Organize dimming and output cables
- Make troubleshooting easy
In large homes, proper termination avoids future electrical issues.
9. Cable Ducts (Wire Management Channels)
These grey channels hide and guide the wires.
What they do:
- Keep wiring neat and professional.
- Prevent overheating
- Protect cables from physical damage
Good wire management is a sign of high-quality panel workmanship.
10. DIN Rail (Mounting Structure)
This is the metal rail on which devices are mounted.
What it does:
- Holds all modules firmly
- Allows easy replacement or expansion
- Maintains panel alignment and strength
Future rooms or new lighting zones can be added easily.
How This System Works in Daily Life (Simple Flow)
- 1. You press a button on a wall keypad.
- 2. The main controller (No. 1) receives the command.
- 3. It sends instructions to power modules (Nos.2–5).
- 4. MCBs (Nos.6–7) ensure safe power flow.
- 5. Lights dim, brighten, or switch ON/OFF smoothly.
All of this happens in less than a second.
Benefits for a 10,000 sq ft luxury home
- Clean walls with fewer switches
- One-touch lighting scenes
- Energy-efficient dimming
- Longer LED life
- Safe and organized wiring
- Easy future expansion
Final Thought
This lighting automation panel acts like the brain and control center of a large home.It quietly manages comfort, safety, and ambience while staying completely hidden from daily life.
In luxury homes, true comfort is not seen—it is experienced.
We offer design / turnkey execution with lighting, MEP and visual merchandising integration for your space. Visit www.nextbc.in to learn more . . .
Thanks
Recent Article

Our Related News

Choosing Aesthetics Over Functionality: A Design Dilemma for Homeowners
When designing your dream home, it’s tempting to prioritize beautiful aesthetics—sleek countertops, statement lighting...

Ignoring Natural Lighting: A Common Oversight in Home Design
When designing a home, every decision—from color palettes to materials—contributes to the space's...

Why the Liquor Store Layout Impacts Customer Flow & Billing Speed
See how smarter aisle planning and checkout zoning reduce queues while lifting add-on sales.

How a Well-Designed Interior Increases Liquor Store Sales
Layout, adjacencies and lighting tweaks that raise basket size in specialty retail.